Popular Posts

Showing posts with label DIY. Show all posts

Wednesday, December 8, 2021

Christmas Tree Ornament

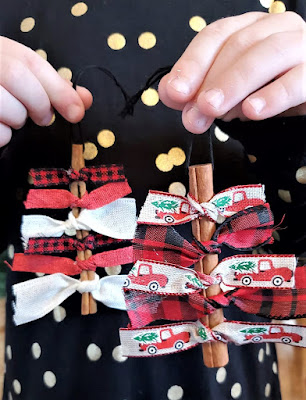
 Christmas Tree Ornament with Cinnamon Sticks 

These are cute and smell great! I made these to hang on out tree this year. I love that they were super easy to make so the kids were able to make some too. 

All you need is cinnamon sticks, some cute ribbon, string and hot glue!


Supply List

Cinnamon Sticks

Ribbon (with wire works best, but is not necessary)

String or hooks for hanging

Hot glues gun and Glue

Drill with a small drill bit (optional)


Follow these few steps to make these cute ornaments!

1. To hang your ornament you will need a string or a hook connected to the cinnamon stick. I used a drill with a very small drill bit to put a hole through one end of the cinnamon stick. I then put the string through the hole to have a hanger. If you don't want to make a hole you could also tie a sting around the cinnamon stick and secure it with some hot glue. 

2. Tie some ribbon pieces on your cinnamon stick making them shorter to longer from top to bottom. If you are using wired ribbon they will stick out from the sides better. If you are not using wired ribbon you will be able to glue them to the cinnamon stick a little so they will stick out. 

3. Using the hot glue help secure the ribbons to the cinnamon stick if necessary. 

4. Now you are done and have a cute ornament to hang on your tree or even use as a gift! 

Happy Holidays!


Sunday, March 15, 2020

Hand Print Rainbow with a Pot of Gold


Hand Print Rainbow with a Pot of Gold


Materials:
Directions:
  1. Trace a little hand onto the construction paper and cut out one for each of the rainbow colors.(Red, Orange, Yellow, Green, Blue, Purple)
  2. Cut out a pot in black paper, and cut out your gold in gold or yellow paper. 
  3. Glue together the hands in a rainbow shape.
  4. Glue on your gold and pot to the hands.
  5. Hang it up for a cute St. Patrick's Day decoration!

Monday, November 11, 2019

Snowman made with Birch Logs


This is so cute and rustic! 

Great way to add some winter decor to your home!


Materials:
  • Birch Logs, 1 large, 1 medium, 2 small, and 1 slice. 
  • 1 Wood dowel (1/4 inch)
  • Drill with a bit slightly bigger than your dowel
  • Wood Glue
  • Fabric for a scarf and bow ( I used Flannel)
  • Acrylic Paint
  • Craft Glue or Hot Glue
  • 2-3 Small Black Buttons
Directions:
  1. Get your logs cut and sand them if needed. If you find a small one with a branch piece sticking out you can use it for the nose. 
  2. Drill a hole half way through the center of your largest log. Drill a hole, in the center, all the way through the medium log, 1 small log, and the slice. Drill a hole half way through the last small log. 
  3. Now put the dowel through and stack your logs large, medium, small, slice, and small. Add wood glue in the drilled holes if you would like it to be sturdy. You may need to cut down your dowel to make it the right length. 
  4. Paint on a snowman face. I just did the the eyes because I had a branch piece for the nose and didn't want to add a mouth. If you do not have a branch sticking out just paint on a carrot nose. Make it the way you want!
  5. Use your fabric to make a scarf and a small bow for the hat.
  6. Glue on your bow for the hat and the buttons. 
  7. Now you are done and have a cute little snowman to decorate with or even give as a gift!

Sunday, November 10, 2019

DIY Wood Trees


These wood trees are so cute and easy to make. 

Perfect for some holiday decor!


Materials:
  • 1x2 furring strip boards
  • Saw
  • Small nails and hammer or a nail gun
  • Acrylic paint

Directions:
  1. Start with cutting your boards. These don't need to be any specific size, you can make them and small or large as you want. I start with the center tall board. My trees are about 18 inches tall.
  2. Next cut the branch pieces. The top one at 3 inches, and then add 1 inch to the next one each time going down (3in, 4in, 5in...). For the base I cut 4 boards, 5 inches long. 
  3. Now you can nail your tree together. Start by nailing the base piece on, like shown in the image below. Next add the branch pieces on the center tall board, hang the base over the end of your table space so the boards lay flat. Be careful!
  4. Now that you have your tree put together you can add some paint to the front side if you would like. Another option would be to stain the entire tree a dark brown or even leave it natural. 
  5. Now you can place your trees in your home or outside for some cute decor. I like to put mine on my upper cabinets in my kitchen. To add a little holiday cheer you could add some small lights or mini ornaments to your tree. If you decide you want to put your outside, it would be best to seal the wood and paint. 

Scarecrow and Snowman Double Sided Porch Decor

This Scarecrow and snowman reversible porch decor is so cute. Flip it to the scarecrow for the fall season and then to the snowman for the winter. What a fun project to make! 


Materials:

  • 1 1x10 Pine Board cut at an angle (height 40in)
  • 2 1x2 Pine Boards (length 13in)
  • Nails and Hammer or Air Nail Gun
  • Acrylic Paints
  • Clear Satin Spray Paint
  • Twine String
  • Buttons 
  • Greenery for Snowman Hat
  • Leaves and Flower for Scarecrow Hat
  • Hot Glue Gun & Glue

Directions:
  1. Cut Board and lightly sand if necessary. 
  2. Nail the small boards towards the top at an angle. If you cut the 1x10 at an angle, then measure from the top to your small board to make the angle is the same. 
  3. Paint one side white with a black hat for the snowman. Then paint the other side light brown with a dark brown hat for the scarecrow. Let the paint dry good before painting the other side. 
  4. Add the details! I painted a face and scarf on the snowman. I Added a shirt, overalls, and face to the scarecrow. 
  5. After you are done with all of the painting, you will want to do a clear coat over it all. I use clear satin spray paint to seal it for the outdoors. 
  6. Warm up your hot glue gun. I added the twine string with a bow, buttons on the overalls, and leaves and a flower to the hat on the scarecrow side. Add buttons to the belly and winter greenery to the hat on the snowman side. 
  7. Place inside or outside to decorate for the fall season and then flip it over for the winter season. This is also a great gift idea!


Monday, December 3, 2018

Apple Tree Apple Print Painting


Apple Tree Painting with Apples


Materials:
  • Paper
  • Brown, Red, & Green Paint
  • Paint Brush
  • 1 Apple
  • 2 Forks
  • 2 Plates
Directions:
  1. Get all materials ready. Cut the apple in half and poke a fork in each half to use a handle. 
  2. Using the brown paint and brush, paint a tree with branches. 
  3. Put some red paint on one plate and green paint on the other. 
  4. Using one apple, dip it into the green paint and use it like a stamp to create the leafy area on your tree. 
  5. Next use the other apple. Dip it in the red paint and use it like a stamp to make some apples on your tree. 
  6. Make as many paintings as you want. When finished throw the apple away and clean up your materials. 
  7. Let your painting dry and then hang it up!
  

S'more Snack for Kids


S'mores Snack Mix

My kids love to have this as a snack. 
It is fun for them to make little mini s'mores!


Ingredients:

1 cup Honey Graham Cereal 
1/4 cup Milk Chocolate Chips
1/2 cup Mini Marshmallows

Directions:

 Mix all the ingredients in a bowl. Enjoy!

Blue Mason Jar Potpourri Decor


Blue Mason Jar Decor

Materials: 
  • Blue Mason Jar
  • Potpourri
  • Twine String
  • Printed vintage Photo

Directions:
  1. Fill the jar with potpourri.
  2. Tie the twine around the top of the jar with the vintage photo attsched.
  3. Use as decor in your home or give as a gift. Great as a teacher or coworker gift. 

Wednesday, September 26, 2018

Unicorn Ice Cream Cone Cakes


Unicorn Cone Cakes


Ingredients:
  • 24 Ice Cream Cones
  • 1 box of Cake Mix and Ingredients Listed on Box
  • 2 Tubs of White or Vanilla Frosting
  • Food Coloring Gel
  • Frosting Piping Bag and Large Star Tip
  • Mini Marshmallows
  • Pink Sugar Sprinkles
  • Starburst Unicorn Horns
Directions:
  1. Preheat over and prepare the cake mix according to the box. 
  2. Place the cones in muffin pans. Use foil if needed to keep the cones from tipping over, or just have a steady hand when moving the pans. 
  3. Fill each cone leaving at least 1/2 inch of space from the top of the cone. This will give the cake batter space to rise. I learned this the hard way. 
  4. Bake the cake for about 12-15 minutes Keep an eye on the cake and check it to see if it is baked through. It could take more or less time depending on the mix you have. 
  5. Move cone cakes to a cooling rack. 
  6. Prepare your frosting. Separate the white frosting into 3rds, keeping one 3rd white. Using food coloring turn one 3rd pink and the other purple. Using the gel color will keep the frostings consistency, if you use liquid it could make the frosting runny. 
  7. Make sure your tip is in the piping bag. Scoop the frosting into the bag switching colors with each scoop. Do not stir the colors together. As you squeeze the frosting out of the bag it will swirl together. 
  8. Top each of your cone cakes with frosting once they are cooled.
  9. Prepare your Unicorn Horns (click the link for the directions).
  10. Make the ear with the mini marshmallows. Cut one marshmallow in half diagonally along the side with a clean scissors. Dip the sticky parts in sugar sprinkles. 
  11. Place the horn in the center of the frosted cones and then the ears on each side of the horn. 
  12. Use a cake pan with a sheet of colored tissue paper laid in it to hold the cones. 
  13. Enjoy!


Starburst Unicorn Horn Cupcake Decoration


Starburst Unicorn Horn 


Materials:
  • Starburst Candies (1 will make 2 horns) 
  • Knife

Directions:
  1. Unwrap a few starbursts and cut them in half. 
  2. Take one half and start to squish, pull, and twist it into a snake like shape. Have each end be thinner and the center be thick. Do this again with another color. 
  3. Take your 2 stretched colors and twist them together. 
  4. Cut your twisted starbursts in half and then you have 2 horns. 
  5. Use these to decorate cupcakes or other sweet treats!
Notes: I used the Starburst FavReds to get all the pink colors!  Click here for the Cone Cake Recipe!


Monday, September 17, 2018

Spicy Shrimp & Tortellini Soup


This Soup is Another Family Favorite!


This is a very spicy soup. If you are not a fan of spicy food check out my variations below.

Ingredients:
  • 1/4 cup Olive Oil
  • 2 Celery Sticks, Chopped
  • 4 Garlic Cloves, Smashed & Peeled
  • 2 large Shallots, Chopped
  • 1/4 tsp Salt
  • 1/4 tsp Black Pepper
  • 1 lb Chorizo (Spicy Pork Sausage)
  • 2 Cups Dry-White Wine (Pinot Grigio)
  • 1 6oz Can Tomato Paste
  • 6 cups Chicken Broth
  • 2 Dry Bay Leaves
  • 1 pack Three Cheese Tortellini (not dry)
  • 1 Pound Peeled & Deveined Shrimp (uncooked)
  • 1 15oz can of Cannellini Beans (White Kidney Beans), Rinsed & Drained
  • 1 Cup Fresh Basil Leaves, 
  • 1 Tbs Chopped Fresh Thyme or 1 tsp dry Thyme
  • Crusty Bread

Directions:
  1. In a large stock pot heat the oil over medium-high heat. Add the Celery, Garlic, Shallots, Salt, & Pepper. Cook until vegetables are slightly softened, 4-5 mins. 
  2. Add the Chorizo. Break into pieces with a wood sppon and cook until brown, 4-5 mins. 
  3. Add the Wine and scrape the brown bits off the bottom of the pan. 
  4. Stir in Tomato Paste, Chicken Broth, and Bay Leaves. Cover, bring to a simmer, and cook at a Medium-low heat for 5 mins. 
  5. Bring back to a boil, uncover, add the Pasta, Shrimp, Beans, Basil, and Thyme. Cook until the shrimp and pasta are cooked through, 4 mins. Shrimp will turn pink once cooked. 
  6. Remove Bay Leaves and discard. 
  7. Serve with a crusty bread. I love toasted french bread with a little butter and garlic salt. 

Tips:
  • If you are not a fan of Spicy food try a mild sausage or any other favorite ground meat.
  • Make sure you get the fresh 3 cheese tortellini usually found near the produce in a cooler. 


Sunday, September 16, 2018

Crispy Belgian Waffle Recipe


 I Love This Waffle Recipe! My Family Goes Crazy Over These. 


I am not a fan of soggy Belgian Waffles. These get a perfect crispy texture that makes you want more! Try these and you will fall in love like we did!

Ingredients:

  • 2 cups All Purpose Flour
  • 3/4 cup Granulated Sugar
  • 3 1/2 tsp. Baking Powder
  • 2 Eggs, Separated
  • 1 1/2 cups Whole Milk
  • 1 Cup Salted Butter, Melted
  • 1 1/2 tsp Vanilla Extract

Directions:
  1. Preheat your waffle maker. 
  2. Mix together flour, sugar, and baking powder in a large bowl and set aside.
  3. In another bowl beat egg yokes. Add the milk, melted butter, and vanilla and mix well. 
  4. Add the liquid mixture to the flour mixture and mix until combined. 
  5. With an electric mixer, beat the egg whites in a separate bowl. Beat until stiff peaks form. 
  6. Use a rubber spatula to gently fold the egg whites into the batter until just combined. Do not over mix. 
  7. Spray the waffle maker with cooking oil. Add your batter and cook the waffles according to your waffle maker. 
  8. Once cooked remove them from the waffle maker. Serve immediately with whipped cream (Recipe) and fresh sliced strawberries or with your favorite syrup! 


  • Tips:  If you do not serve and eat immediately spread them out to cool. If you stack them, the steam will be trapped and make them soggy. Once cooled you can freeze to reheat later. When reheating them, let them defrost and then pop them in the toaster to get the crisp texture back. 


Halloween Pumpkin Bucket Light


This is such a fun and cute way to decorate for Halloween! Simple, Easy and Cheap!


Get a plastic pumpkin bucket at your local store or the dollar store. They are usually around $1. Remove the handles from the bucket.

Depending on the type of light fixture you have you will have to figure out how to attach it. I removed the glass part of my fixture and just slid the bucket on. The screws that were sticking out for the glass attachment are holding on the bucket for me. Another way to attach the bucket would be to cut it and wrap it around your fixture. 

If you are worried about the bulb being too hot, use LED bulbs!


Sunday, August 19, 2018

Exploding Paint Craft with Alka Seltzer


This was so much fun to do! The kids had a blast and I did too!


 Materials:
  • Paint
  • Small Film Canisters
  • Paper or Canvas
  • Alka Seltzer Tablets
  • Water
  • Outdoor space for easy cleanup 
  • Disposable table cloth, plastic shower curtain, or newspaper. 

Directions:


  1. Get all of your materials ready.
  2. Lay out the disposable table cloth, newspaper, or old plastic shower curtain.
  3. Lay down your paper or canvas. 
  4. Put some paint in a few film canisters 1/3 full. Add a little water (about 1tsp). Stir or shake it up to mix it. 
  5. Get ready to move quickly. Break an Alka Seltzer tablet in half, put both halves in a canister with paint. Put the cover on quickly and set it upside down on the paper or canvas. 
  6. Stand back, the canister may fly far. The Alka Seltzer bubbles will build pressure and cause the top to pop off and create a fun splatter painting.
  7. Continue to fill and explode the canisters until you have a painting you love. 
  8. Clean up, let your painting dry and then hang it up to show off your work!


Thursday, August 16, 2018

Rustic Flower Pot using an Old Fire Pit.


I love having something rustic in my flower garden!


Materials:

  • Old Fire Pit
  • Drill and bit (if needed)
  • Small Rocks
  • Potting Soil
  • Flowers


Directions:

  1. Once you have a fire pit. Find a place for it. I will get heavy once it is full of dirt and flowers. I like to put mine in my garden but it would also look nice in front of the garage, or on the patio or deck. 
  2. When it is in its place make sure there is a drain hole in the center. Mine already had one. If yours doesn't, use a drill and a bit to make a small hole (about 1/4"). 
  3. Put some small rocks in the bottom of the pot. This will create some draining. 
  4. Fill the pot with potting soil and then your flowers. I like to put something tall in the center to give it a little height. 
  5. Don't Forget to water each day!

Easy Rustic Movie Poster Frame


We have a movie theater theme in out living room but wanted to keep the rustic theme going in our house. So we made rustic frames for our movie theater.


Materials:


  • Pine wood 1x4
  • Stain or Clear Coat
  • Tape Measure
  • Saw
  • Wood Glue
  • Nails and a nail gun
  • Hanging Hardware
  • Movie Poster
  • Tape


Directions:


  1. Measure the height and width of your poster. 
  2. Measure out the length of your boards to fit your poster. Make sure you have them long enough that your don't cover a lot of the poster but short enough that you will be able to cover a bit of the edge with the frame. 
  3. Double check your measurements and then cut your boards. 
  4. Glue and nail together each board to create the frame. 
  5. Let the glue dry and then stain or clear coat the wood. 
  6. Attach the hanging hardware to the back of the frame. 
  7. After the frame is complete simply tape the corners and a couple edges of the poster to the frame. 
  8. Hang up your poster and then enjoy your movie and popcorn!

Tuesday, August 7, 2018

DIY Rustic Wash Tub Shelf


Wash Tub Shelf

Materials:
  • Rustic Wash Tub
  • 1x10 board 
  • Stain
  • Screws, drill, tape measure, level. 
Directions:
  1. Gather all the materials needed.
  2. Chose where you want the shelf inside the tub. I put mine off center so there would be a larger space at the top. 
  3. Measure the width in the bottom and the top of the tub to get the angle cut correct. 
  4. Cut you board and stain it to your liking. 
  5. Once the stain is dry place the board in the tub and make sure it is level. 
  6. Use a drill to screw the board in place. Put the screws through the side of the tub. 
  7. To hang up we found a stud in the wall and drilled through the bottom of the tub to screw it to the stud. 
  8. Put your things in the shelf and show it off to your guests.

Note: There are many different sizes and shapes of tin buckets that you could use. If you have a large wall space you could hang more than one of these shelves. 


09 10