Showing posts with label Winter. Show all posts

Wednesday, December 8, 2021

Christmas Tree Ornament

 Christmas Tree Ornament with Cinnamon Sticks 

These are cute and smell great! I made these to hang on out tree this year. I love that they were super easy to make so the kids were able to make some too. 

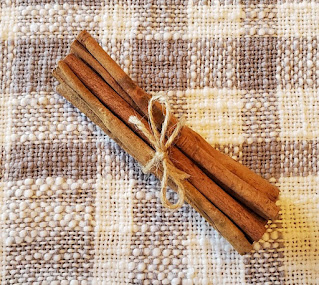
All you need is cinnamon sticks, some cute ribbon, string and hot glue!


Supply List

Cinnamon Sticks

Ribbon (with wire works best, but is not necessary)

String or hooks for hanging

Hot glues gun and Glue

Drill with a small drill bit (optional)


Follow these few steps to make these cute ornaments!

1. To hang your ornament you will need a string or a hook connected to the cinnamon stick. I used a drill with a very small drill bit to put a hole through one end of the cinnamon stick. I then put the string through the hole to have a hanger. If you don't want to make a hole you could also tie a sting around the cinnamon stick and secure it with some hot glue. 

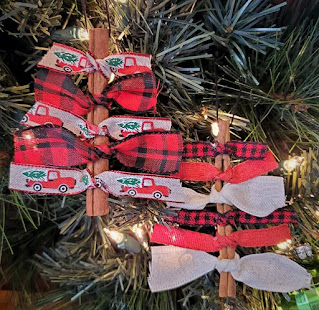
2. Tie some ribbon pieces on your cinnamon stick making them shorter to longer from top to bottom. If you are using wired ribbon they will stick out from the sides better. If you are not using wired ribbon you will be able to glue them to the cinnamon stick a little so they will stick out. 

3. Using the hot glue help secure the ribbons to the cinnamon stick if necessary. 

4. Now you are done and have a cute ornament to hang on your tree or even use as a gift! 

Happy Holidays!


Tuesday, November 19, 2019

"Elsa's Ice" Rock Candy


Disney's Frozen II is coming out in theaters this week! Elsa's Ice Candy is perfect to make for a Disney's Frozen themed Party or just for fun. I made this for a fun treat for my kids and they loved in.


Ingredients:
  • 1-3/4 cups Granulated Sugar
  • 1/2 cup Light Corn Syrup
  • 1/2 cup Water
  • Food Coloring 
  • 1/2 tsp. Flavoring
  • Powdered Sugar for coating
*Other materials you will need include a sauce pan, baking sheet, and candy thermometer. 

Directions:
  1. Lightly spray a baking sheet or place a silicone baking mat on a baking sheet. 
  2. Add sugar, corn syrup, and water to a sauce pan. Bring to a boil while stirring constantly to dissolve sugar. Once it is boiling you can stop stirring. Let it keep boiling until it reaches 300℉ on your candy thermometer. 
  3. Once the temperature reaches 300℉ remove it from the heat. Working quickly, add the food coloring and flavor. I used strawberry flavor and a few drops of blue gel food coloring, so it ended up tasting like cotton candy. Stir quickly and pour onto your prepared baking sheet. Tip the sheet frpm side to side to help spread the candy and tap the sheet lightly to remove bubbles. 
  4. Allow the candy to cool and harden completely, about 30 minutes.
  5. Flip the baking sheet over to remove the candy. Use a hammer or something sturdy to break your candy into desired size pieces. 
  6. Coat your candy pieces in powdered sugar. This will stop it from being sticky. If you want cleaner or more clear looking pieces, use a lint free cloth to rub some of the powdered sugar off. 
  7. Keep in an air tight container. Enjoy!

Tips/variations:
*You can make your candy any color or flavor. This could be an easy treat to add to any themed party. I love to have red cinnamon candy during the holidays.  
*Be careful when breaking the candy, it will be a little sharp.


Saturday, February 23, 2019

Watercolor Snow Painting

When it's to cold to go out and play in the snow you bring it in! My kids loved painting the snow!


Materials:
  • Watercolor paints
  • Brush
  • Waterproof container or plate
  • Water in a dish
  • Snow

Directions:
  1. Set up paints and water.
  2. Put snow on a plate or in a dish. 
  3. The kids will have to get their brush and paints wet to start painting.
  4. Have fun!

Thursday, February 21, 2019

Mint Chip Cookies


These Taste Just Like Mint Chip Ice Cream!


Ingredients:
  • 1 cup Butter, Softened
  • 1 1/2 cups Sugar
  • 2 Eggs
  • 1 1/2 tsp. Mint Extract (not peppermint)
  • 1/2 tsp Vanilla Extract
  • Green Food Coloring
  • 3 Cups Flour
  • 2 tsp. Baking Powder
  • 1 tsp. Baking Soda
  • 2 tsp. Cream of Tarter
  • 1/4 tsp. Salt
  • 1 Cup Andes Cream de Menthe Baking Chips
  • 1 Cup Semi-Sweet Chocolate Chips


Directions:
  1. Preheat oven to 350℉
  2. Cream Butter and sugar until fluffy. 
  3. Add eggs, 5-10 drops of food coloring, and mint extract. Mix well for about 2 mins. Add more food coloring if needed, the color will lighten when dry ingredients are added. 
  4. In a separate bowl mix dry ingredients. Sift into wet ingredients a little at a time. Mix until combined. 
  5. Add the mint and chocolate chips and stir until incorporated. 
  6. Line cookie sheets with parchment paper or silicon mats. Drop cookies using a cookie scoop or about 1 1/2 table spoon size balls. 
  7. Bake for 8-10 mins. Watch for them to start cracking and then remove from oven. Let cool on baking sheet for a few minutes to set. Transfer to a cooling rack to finish cooling. 
  8. Enjoy within 4-5 days! Yum!

Tips/Variations:
  • You can put these in the freezer once baked and cooled to save for a special occasion. These are best if frozen in an air tight container for up to a month. 
  • These are great any time of the year but great for Christmas or St. Patrick's Day because they are green. 
  • Make these into an ice cream sandwich with one scoop of vanilla ice cream between for a cool treat. Or break into pieces over a bowl of ice cream.

Popular Posts

09 10