Popular Posts

Showing posts with label Kids. Show all posts

Wednesday, December 8, 2021

Christmas Tree Ornament

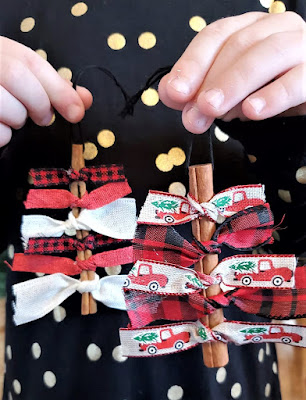
 Christmas Tree Ornament with Cinnamon Sticks 

These are cute and smell great! I made these to hang on out tree this year. I love that they were super easy to make so the kids were able to make some too. 

All you need is cinnamon sticks, some cute ribbon, string and hot glue!


Supply List

Cinnamon Sticks

Ribbon (with wire works best, but is not necessary)

String or hooks for hanging

Hot glues gun and Glue

Drill with a small drill bit (optional)


Follow these few steps to make these cute ornaments!

1. To hang your ornament you will need a string or a hook connected to the cinnamon stick. I used a drill with a very small drill bit to put a hole through one end of the cinnamon stick. I then put the string through the hole to have a hanger. If you don't want to make a hole you could also tie a sting around the cinnamon stick and secure it with some hot glue. 

2. Tie some ribbon pieces on your cinnamon stick making them shorter to longer from top to bottom. If you are using wired ribbon they will stick out from the sides better. If you are not using wired ribbon you will be able to glue them to the cinnamon stick a little so they will stick out. 

3. Using the hot glue help secure the ribbons to the cinnamon stick if necessary. 

4. Now you are done and have a cute ornament to hang on your tree or even use as a gift! 

Happy Holidays!


Sunday, March 15, 2020

Hand Print Rainbow with a Pot of Gold


Hand Print Rainbow with a Pot of Gold


Materials:
Directions:
  1. Trace a little hand onto the construction paper and cut out one for each of the rainbow colors.(Red, Orange, Yellow, Green, Blue, Purple)
  2. Cut out a pot in black paper, and cut out your gold in gold or yellow paper. 
  3. Glue together the hands in a rainbow shape.
  4. Glue on your gold and pot to the hands.
  5. Hang it up for a cute St. Patrick's Day decoration!

Tuesday, November 19, 2019

"Elsa's Ice" Rock Candy


Disney's Frozen II is coming out in theaters this week! Elsa's Ice Candy is perfect to make for a Disney's Frozen themed Party or just for fun. I made this for a fun treat for my kids and they loved in.


Ingredients:
  • 1-3/4 cups Granulated Sugar
  • 1/2 cup Light Corn Syrup
  • 1/2 cup Water
  • Food Coloring 
  • 1/2 tsp. Flavoring
  • Powdered Sugar for coating
*Other materials you will need include a sauce pan, baking sheet, and candy thermometer. 

Directions:
  1. Lightly spray a baking sheet or place a silicone baking mat on a baking sheet. 
  2. Add sugar, corn syrup, and water to a sauce pan. Bring to a boil while stirring constantly to dissolve sugar. Once it is boiling you can stop stirring. Let it keep boiling until it reaches 300℉ on your candy thermometer. 
  3. Once the temperature reaches 300℉ remove it from the heat. Working quickly, add the food coloring and flavor. I used strawberry flavor and a few drops of blue gel food coloring, so it ended up tasting like cotton candy. Stir quickly and pour onto your prepared baking sheet. Tip the sheet frpm side to side to help spread the candy and tap the sheet lightly to remove bubbles. 
  4. Allow the candy to cool and harden completely, about 30 minutes.
  5. Flip the baking sheet over to remove the candy. Use a hammer or something sturdy to break your candy into desired size pieces. 
  6. Coat your candy pieces in powdered sugar. This will stop it from being sticky. If you want cleaner or more clear looking pieces, use a lint free cloth to rub some of the powdered sugar off. 
  7. Keep in an air tight container. Enjoy!

Tips/variations:
*You can make your candy any color or flavor. This could be an easy treat to add to any themed party. I love to have red cinnamon candy during the holidays.  
*Be careful when breaking the candy, it will be a little sharp.


Tuesday, July 23, 2019

Baby Shark Ocean Themed Cake


Baby Shark Doo Doo!


This is a perfect Cake to make for a ocean themed party. You could add any type of cake topper, just like I added a baby shark. I made this as a smash cake for a 1st birthday! It was the perfect addition to the baby shark themed party!


Materials

Directions:

  1. Make sure you have all of your materials. 
  2. Start by splitting your white frosting into 2 separate bowls. Color 1 bowl of frosting a darker shade of blue and the other a lighter shade of blue. 
  3. Use the lighter shade of blue and coat the whole cake with a thin layer. Chill for 10 minutes. Chilling will help stiffen the frosting making it easier to spread and get a smooth look. 
  4. Next spread the darker shade of frosting around the bottom half of the cake. Smooth it out to create an ombre look. I also added the darker frosting to just the top of the cake. Let Chill again for at least 10 minutes. 
  5. Now you get to add the ocean decorations. First cut the sour gummy strips into starfish, seaweed and coral. I used red for starfish, orange cut thin and twisted to make coral, and then green cut to look like seaweed. If you would like you could also cut out small fish or other shapes of coral. Stick these decorations around the outside of the cake. 
  6. Use the sprinkles to add final details. Use the white pearl sprinkles to add bubbles and the colored sprinkles to create a rock look to the bottom of the ocean. I also used the colored sprinkles to add detail to the top of the cake. 
  7. Last add your cake topper and show off your beautiful cake!


Friday, July 19, 2019

Fish Craft for Summer


Gone Fishing!


What a fun craft for the kids to make during the summer. On the days it's too hot out and we are stuck inside it is the best time to make a craft! 


Materials:


Directions:


  1. Get all materials ready on a washable surface. 
  2. Cut our a fish shape from one color of construction paper, and a bobber shape out of a white paper. 
  3. Paint the top and bottom of the bobber red. We did both sides so when we hang it up it can spin around. 
  4. Next paint and decorate the fish, on both sides if you would like. We used a sponge roller to create a splattered look on the fish. Next we glued on the glitter just in the spots where the fins would be. We also did glitter for the eyes. 
  5. After all of the paint and glue is dry, use the hold punch to make a hole in the end of the fish and the top and bottom of the bobber. 
  6. Tie the fish and the bobber together and then hang it up!


Friday, April 5, 2019

Bunny Craft With Cotton Balls


Fluffy Bunnies!


Materials:
  • Colored Card Stock Paper
  • Cotton Balls
  • Googly Eyes
  • Glue Stick
  • Liquid Glue
  • Scissors

Directions:
  1. Draw your bunny shape and cut it out. Use the extra scraps to cut out a nose and whiskers.
  2. Pull apart some cotton balls and use the glue stick to glue on the cotton. Glue some only around the edge of the ears to show some color inside them.
  3. Glue on the eyes, nose, and whiskers using the liquid glue.
  4. Let the glue dry and then hang up your craft!


Hop! Hop! Hop!

Saturday, February 23, 2019

Watercolor Snow Painting

When it's to cold to go out and play in the snow you bring it in! My kids loved painting the snow!


Materials:
  • Watercolor paints
  • Brush
  • Waterproof container or plate
  • Water in a dish
  • Snow

Directions:
  1. Set up paints and water.
  2. Put snow on a plate or in a dish. 
  3. The kids will have to get their brush and paints wet to start painting.
  4. Have fun!

Thursday, February 21, 2019

Special K Bars


A Delicious Classic Bar for any occasion!


Ingredients:
  • 1 cup Sugar
  • 1 cup Corn Syrup
  • 1 cup Peanut Butter
  • 6 cups Kellogs Special K Cereal
  • 1 cup Milk Chocolate Chips
  • 1 cup Butterscotch Chips

Directions:
  1. In a pot on the stove at medium heat, stir the sugar and corn syrup constantly until boiling. 
  2. Remove from heat and stir in Peanut butter. 
  3. Put cereal in a large bowl. Pour the sugar over the cereal and mix well. 
  4. Pour into a lined cake pan and press flat.
  5. Melt together both chips on low heat in a small pan. Stir constantly so it does not burn. Pour over the bars and smooth out with a knife. 
  6. Put in the fridge to cool. Once cooled, cut into bars. 
  7. Enjoy!

Tips/Variations:
  • Add festive sprinkles to the top of the chocolate before cooling for special occasions. 
  • If you melt the chips in the microwave be sure to stir every 20 to 30 seconds. It will burn quickly. 


Mint Chip Cookies


These Taste Just Like Mint Chip Ice Cream!


Ingredients:
  • 1 cup Butter, Softened
  • 1 1/2 cups Sugar
  • 2 Eggs
  • 1 1/2 tsp. Mint Extract (not peppermint)
  • 1/2 tsp Vanilla Extract
  • Green Food Coloring
  • 3 Cups Flour
  • 2 tsp. Baking Powder
  • 1 tsp. Baking Soda
  • 2 tsp. Cream of Tarter
  • 1/4 tsp. Salt
  • 1 Cup Andes Cream de Menthe Baking Chips
  • 1 Cup Semi-Sweet Chocolate Chips


Directions:
  1. Preheat oven to 350℉
  2. Cream Butter and sugar until fluffy. 
  3. Add eggs, 5-10 drops of food coloring, and mint extract. Mix well for about 2 mins. Add more food coloring if needed, the color will lighten when dry ingredients are added. 
  4. In a separate bowl mix dry ingredients. Sift into wet ingredients a little at a time. Mix until combined. 
  5. Add the mint and chocolate chips and stir until incorporated. 
  6. Line cookie sheets with parchment paper or silicon mats. Drop cookies using a cookie scoop or about 1 1/2 table spoon size balls. 
  7. Bake for 8-10 mins. Watch for them to start cracking and then remove from oven. Let cool on baking sheet for a few minutes to set. Transfer to a cooling rack to finish cooling. 
  8. Enjoy within 4-5 days! Yum!

Tips/Variations:
  • You can put these in the freezer once baked and cooled to save for a special occasion. These are best if frozen in an air tight container for up to a month. 
  • These are great any time of the year but great for Christmas or St. Patrick's Day because they are green. 
  • Make these into an ice cream sandwich with one scoop of vanilla ice cream between for a cool treat. Or break into pieces over a bowl of ice cream.

Banana Bread


 This always turns out moist and delicious! It never lasts long in our house!


Ingredients:
  • 1/2 cup Butter, Softened
  • 1 cup Sugar
  • 3 Ripe Bananas, mashed
  • 2 eggs, beaten
  • 1/2 tsp Salt
  • 1 tsp Baking Soda
  • 1 1/4 cups Flour

Directions:
  1. Preheat oven to 350℉
  2. Cream together butter and sugar. 
  3. Add beaten eggs and mashed bananas, mix well. 
  4. Mix dry ingredients in a separate bowl. Add slowly to the wet ingredients until combined. 
  5. Pour into a greased and lightly floured loaf pan.
  6. Bake for 45-55 minutes.
  7. Let cool and Enjoy! I like to cut a slice out while it is still warm and spread some butter on it. 

Tips/ Variations:
  • Make banana bread muffins instead! Grease and flour a muffin tin and bake for about 20 minutes. Do not use muffin liners, it will stick. 
  • Keep in an air tight container on the counter for 4-5 days.


Monday, December 3, 2018

Apple Tree Apple Print Painting


Apple Tree Painting with Apples


Materials:
  • Paper
  • Brown, Red, & Green Paint
  • Paint Brush
  • 1 Apple
  • 2 Forks
  • 2 Plates
Directions:
  1. Get all materials ready. Cut the apple in half and poke a fork in each half to use a handle. 
  2. Using the brown paint and brush, paint a tree with branches. 
  3. Put some red paint on one plate and green paint on the other. 
  4. Using one apple, dip it into the green paint and use it like a stamp to create the leafy area on your tree. 
  5. Next use the other apple. Dip it in the red paint and use it like a stamp to make some apples on your tree. 
  6. Make as many paintings as you want. When finished throw the apple away and clean up your materials. 
  7. Let your painting dry and then hang it up!
  

S'more Snack for Kids


S'mores Snack Mix

My kids love to have this as a snack. 
It is fun for them to make little mini s'mores!


Ingredients:

1 cup Honey Graham Cereal 
1/4 cup Milk Chocolate Chips
1/2 cup Mini Marshmallows

Directions:

 Mix all the ingredients in a bowl. Enjoy!

Wednesday, September 26, 2018

Unicorn Ice Cream Cone Cakes


Unicorn Cone Cakes


Ingredients:
  • 24 Ice Cream Cones
  • 1 box of Cake Mix and Ingredients Listed on Box
  • 2 Tubs of White or Vanilla Frosting
  • Food Coloring Gel
  • Frosting Piping Bag and Large Star Tip
  • Mini Marshmallows
  • Pink Sugar Sprinkles
  • Starburst Unicorn Horns
Directions:
  1. Preheat over and prepare the cake mix according to the box. 
  2. Place the cones in muffin pans. Use foil if needed to keep the cones from tipping over, or just have a steady hand when moving the pans. 
  3. Fill each cone leaving at least 1/2 inch of space from the top of the cone. This will give the cake batter space to rise. I learned this the hard way. 
  4. Bake the cake for about 12-15 minutes Keep an eye on the cake and check it to see if it is baked through. It could take more or less time depending on the mix you have. 
  5. Move cone cakes to a cooling rack. 
  6. Prepare your frosting. Separate the white frosting into 3rds, keeping one 3rd white. Using food coloring turn one 3rd pink and the other purple. Using the gel color will keep the frostings consistency, if you use liquid it could make the frosting runny. 
  7. Make sure your tip is in the piping bag. Scoop the frosting into the bag switching colors with each scoop. Do not stir the colors together. As you squeeze the frosting out of the bag it will swirl together. 
  8. Top each of your cone cakes with frosting once they are cooled.
  9. Prepare your Unicorn Horns (click the link for the directions).
  10. Make the ear with the mini marshmallows. Cut one marshmallow in half diagonally along the side with a clean scissors. Dip the sticky parts in sugar sprinkles. 
  11. Place the horn in the center of the frosted cones and then the ears on each side of the horn. 
  12. Use a cake pan with a sheet of colored tissue paper laid in it to hold the cones. 
  13. Enjoy!


Starburst Unicorn Horn Cupcake Decoration


Starburst Unicorn Horn 


Materials:
  • Starburst Candies (1 will make 2 horns) 
  • Knife

Directions:
  1. Unwrap a few starbursts and cut them in half. 
  2. Take one half and start to squish, pull, and twist it into a snake like shape. Have each end be thinner and the center be thick. Do this again with another color. 
  3. Take your 2 stretched colors and twist them together. 
  4. Cut your twisted starbursts in half and then you have 2 horns. 
  5. Use these to decorate cupcakes or other sweet treats!
Notes: I used the Starburst FavReds to get all the pink colors!  Click here for the Cone Cake Recipe!


Sunday, September 16, 2018

Crispy Belgian Waffle Recipe


 I Love This Waffle Recipe! My Family Goes Crazy Over These. 


I am not a fan of soggy Belgian Waffles. These get a perfect crispy texture that makes you want more! Try these and you will fall in love like we did!

Ingredients:

  • 2 cups All Purpose Flour
  • 3/4 cup Granulated Sugar
  • 3 1/2 tsp. Baking Powder
  • 2 Eggs, Separated
  • 1 1/2 cups Whole Milk
  • 1 Cup Salted Butter, Melted
  • 1 1/2 tsp Vanilla Extract

Directions:
  1. Preheat your waffle maker. 
  2. Mix together flour, sugar, and baking powder in a large bowl and set aside.
  3. In another bowl beat egg yokes. Add the milk, melted butter, and vanilla and mix well. 
  4. Add the liquid mixture to the flour mixture and mix until combined. 
  5. With an electric mixer, beat the egg whites in a separate bowl. Beat until stiff peaks form. 
  6. Use a rubber spatula to gently fold the egg whites into the batter until just combined. Do not over mix. 
  7. Spray the waffle maker with cooking oil. Add your batter and cook the waffles according to your waffle maker. 
  8. Once cooked remove them from the waffle maker. Serve immediately with whipped cream (Recipe) and fresh sliced strawberries or with your favorite syrup! 


  • Tips:  If you do not serve and eat immediately spread them out to cool. If you stack them, the steam will be trapped and make them soggy. Once cooled you can freeze to reheat later. When reheating them, let them defrost and then pop them in the toaster to get the crisp texture back. 


Halloween Pumpkin Bucket Light


This is such a fun and cute way to decorate for Halloween! Simple, Easy and Cheap!


Get a plastic pumpkin bucket at your local store or the dollar store. They are usually around $1. Remove the handles from the bucket.

Depending on the type of light fixture you have you will have to figure out how to attach it. I removed the glass part of my fixture and just slid the bucket on. The screws that were sticking out for the glass attachment are holding on the bucket for me. Another way to attach the bucket would be to cut it and wrap it around your fixture. 

If you are worried about the bulb being too hot, use LED bulbs!


09 10