Showing posts with label Crafts. Show all posts

Wednesday, December 8, 2021

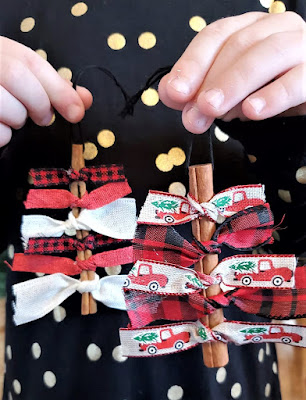
Christmas Tree Ornament

 Christmas Tree Ornament with Cinnamon Sticks 

These are cute and smell great! I made these to hang on out tree this year. I love that they were super easy to make so the kids were able to make some too. 

All you need is cinnamon sticks, some cute ribbon, string and hot glue!


Supply List

Cinnamon Sticks

Ribbon (with wire works best, but is not necessary)

String or hooks for hanging

Hot glues gun and Glue

Drill with a small drill bit (optional)


Follow these few steps to make these cute ornaments!

1. To hang your ornament you will need a string or a hook connected to the cinnamon stick. I used a drill with a very small drill bit to put a hole through one end of the cinnamon stick. I then put the string through the hole to have a hanger. If you don't want to make a hole you could also tie a sting around the cinnamon stick and secure it with some hot glue. 

2. Tie some ribbon pieces on your cinnamon stick making them shorter to longer from top to bottom. If you are using wired ribbon they will stick out from the sides better. If you are not using wired ribbon you will be able to glue them to the cinnamon stick a little so they will stick out. 

3. Using the hot glue help secure the ribbons to the cinnamon stick if necessary. 

4. Now you are done and have a cute ornament to hang on your tree or even use as a gift! 

Happy Holidays!


Sunday, March 15, 2020

Hand Print Rainbow with a Pot of Gold


Hand Print Rainbow with a Pot of Gold


Materials:
Directions:
  1. Trace a little hand onto the construction paper and cut out one for each of the rainbow colors.(Red, Orange, Yellow, Green, Blue, Purple)
  2. Cut out a pot in black paper, and cut out your gold in gold or yellow paper. 
  3. Glue together the hands in a rainbow shape.
  4. Glue on your gold and pot to the hands.
  5. Hang it up for a cute St. Patrick's Day decoration!

Monday, November 11, 2019

Snowman made with Birch Logs


This is so cute and rustic! 

Great way to add some winter decor to your home!


Materials:
  • Birch Logs, 1 large, 1 medium, 2 small, and 1 slice. 
  • 1 Wood dowel (1/4 inch)
  • Drill with a bit slightly bigger than your dowel
  • Wood Glue
  • Fabric for a scarf and bow ( I used Flannel)
  • Acrylic Paint
  • Craft Glue or Hot Glue
  • 2-3 Small Black Buttons
Directions:
  1. Get your logs cut and sand them if needed. If you find a small one with a branch piece sticking out you can use it for the nose. 
  2. Drill a hole half way through the center of your largest log. Drill a hole, in the center, all the way through the medium log, 1 small log, and the slice. Drill a hole half way through the last small log. 
  3. Now put the dowel through and stack your logs large, medium, small, slice, and small. Add wood glue in the drilled holes if you would like it to be sturdy. You may need to cut down your dowel to make it the right length. 
  4. Paint on a snowman face. I just did the the eyes because I had a branch piece for the nose and didn't want to add a mouth. If you do not have a branch sticking out just paint on a carrot nose. Make it the way you want!
  5. Use your fabric to make a scarf and a small bow for the hat.
  6. Glue on your bow for the hat and the buttons. 
  7. Now you are done and have a cute little snowman to decorate with or even give as a gift!

Sunday, November 10, 2019

DIY Wood Trees


These wood trees are so cute and easy to make. 

Perfect for some holiday decor!


Materials:
  • 1x2 furring strip boards
  • Saw
  • Small nails and hammer or a nail gun
  • Acrylic paint

Directions:
  1. Start with cutting your boards. These don't need to be any specific size, you can make them and small or large as you want. I start with the center tall board. My trees are about 18 inches tall.
  2. Next cut the branch pieces. The top one at 3 inches, and then add 1 inch to the next one each time going down (3in, 4in, 5in...). For the base I cut 4 boards, 5 inches long. 
  3. Now you can nail your tree together. Start by nailing the base piece on, like shown in the image below. Next add the branch pieces on the center tall board, hang the base over the end of your table space so the boards lay flat. Be careful!
  4. Now that you have your tree put together you can add some paint to the front side if you would like. Another option would be to stain the entire tree a dark brown or even leave it natural. 
  5. Now you can place your trees in your home or outside for some cute decor. I like to put mine on my upper cabinets in my kitchen. To add a little holiday cheer you could add some small lights or mini ornaments to your tree. If you decide you want to put your outside, it would be best to seal the wood and paint. 

Scarecrow and Snowman Double Sided Porch Decor

This Scarecrow and snowman reversible porch decor is so cute. Flip it to the scarecrow for the fall season and then to the snowman for the winter. What a fun project to make! 


Materials:

  • 1 1x10 Pine Board cut at an angle (height 40in)
  • 2 1x2 Pine Boards (length 13in)
  • Nails and Hammer or Air Nail Gun
  • Acrylic Paints
  • Clear Satin Spray Paint
  • Twine String
  • Buttons 
  • Greenery for Snowman Hat
  • Leaves and Flower for Scarecrow Hat
  • Hot Glue Gun & Glue

Directions:
  1. Cut Board and lightly sand if necessary. 
  2. Nail the small boards towards the top at an angle. If you cut the 1x10 at an angle, then measure from the top to your small board to make the angle is the same. 
  3. Paint one side white with a black hat for the snowman. Then paint the other side light brown with a dark brown hat for the scarecrow. Let the paint dry good before painting the other side. 
  4. Add the details! I painted a face and scarf on the snowman. I Added a shirt, overalls, and face to the scarecrow. 
  5. After you are done with all of the painting, you will want to do a clear coat over it all. I use clear satin spray paint to seal it for the outdoors. 
  6. Warm up your hot glue gun. I added the twine string with a bow, buttons on the overalls, and leaves and a flower to the hat on the scarecrow side. Add buttons to the belly and winter greenery to the hat on the snowman side. 
  7. Place inside or outside to decorate for the fall season and then flip it over for the winter season. This is also a great gift idea!


Friday, July 19, 2019

Fish Craft for Summer


Gone Fishing!


What a fun craft for the kids to make during the summer. On the days it's too hot out and we are stuck inside it is the best time to make a craft! 


Materials:


Directions:


  1. Get all materials ready on a washable surface. 
  2. Cut our a fish shape from one color of construction paper, and a bobber shape out of a white paper. 
  3. Paint the top and bottom of the bobber red. We did both sides so when we hang it up it can spin around. 
  4. Next paint and decorate the fish, on both sides if you would like. We used a sponge roller to create a splattered look on the fish. Next we glued on the glitter just in the spots where the fins would be. We also did glitter for the eyes. 
  5. After all of the paint and glue is dry, use the hold punch to make a hole in the end of the fish and the top and bottom of the bobber. 
  6. Tie the fish and the bobber together and then hang it up!


Friday, April 5, 2019

Bunny Craft With Cotton Balls


Fluffy Bunnies!


Materials:
  • Colored Card Stock Paper
  • Cotton Balls
  • Googly Eyes
  • Glue Stick
  • Liquid Glue
  • Scissors

Directions:
  1. Draw your bunny shape and cut it out. Use the extra scraps to cut out a nose and whiskers.
  2. Pull apart some cotton balls and use the glue stick to glue on the cotton. Glue some only around the edge of the ears to show some color inside them.
  3. Glue on the eyes, nose, and whiskers using the liquid glue.
  4. Let the glue dry and then hang up your craft!


Hop! Hop! Hop!

Saturday, February 23, 2019

Watercolor Snow Painting

When it's to cold to go out and play in the snow you bring it in! My kids loved painting the snow!


Materials:
  • Watercolor paints
  • Brush
  • Waterproof container or plate
  • Water in a dish
  • Snow

Directions:
  1. Set up paints and water.
  2. Put snow on a plate or in a dish. 
  3. The kids will have to get their brush and paints wet to start painting.
  4. Have fun!

Monday, December 3, 2018

Apple Tree Apple Print Painting


Apple Tree Painting with Apples


Materials:
  • Paper
  • Brown, Red, & Green Paint
  • Paint Brush
  • 1 Apple
  • 2 Forks
  • 2 Plates
Directions:
  1. Get all materials ready. Cut the apple in half and poke a fork in each half to use a handle. 
  2. Using the brown paint and brush, paint a tree with branches. 
  3. Put some red paint on one plate and green paint on the other. 
  4. Using one apple, dip it into the green paint and use it like a stamp to create the leafy area on your tree. 
  5. Next use the other apple. Dip it in the red paint and use it like a stamp to make some apples on your tree. 
  6. Make as many paintings as you want. When finished throw the apple away and clean up your materials. 
  7. Let your painting dry and then hang it up!
  

Blue Mason Jar Potpourri Decor


Blue Mason Jar Decor

Materials: 
  • Blue Mason Jar
  • Potpourri
  • Twine String
  • Printed vintage Photo

Directions:
  1. Fill the jar with potpourri.
  2. Tie the twine around the top of the jar with the vintage photo attsched.
  3. Use as decor in your home or give as a gift. Great as a teacher or coworker gift. 

Sunday, August 19, 2018

Exploding Paint Craft with Alka Seltzer


This was so much fun to do! The kids had a blast and I did too!


 Materials:
  • Paint
  • Small Film Canisters
  • Paper or Canvas
  • Alka Seltzer Tablets
  • Water
  • Outdoor space for easy cleanup 
  • Disposable table cloth, plastic shower curtain, or newspaper. 

Directions:


  1. Get all of your materials ready.
  2. Lay out the disposable table cloth, newspaper, or old plastic shower curtain.
  3. Lay down your paper or canvas. 
  4. Put some paint in a few film canisters 1/3 full. Add a little water (about 1tsp). Stir or shake it up to mix it. 
  5. Get ready to move quickly. Break an Alka Seltzer tablet in half, put both halves in a canister with paint. Put the cover on quickly and set it upside down on the paper or canvas. 
  6. Stand back, the canister may fly far. The Alka Seltzer bubbles will build pressure and cause the top to pop off and create a fun splatter painting.
  7. Continue to fill and explode the canisters until you have a painting you love. 
  8. Clean up, let your painting dry and then hang it up to show off your work!


Thursday, August 16, 2018

Easy Rustic Movie Poster Frame


We have a movie theater theme in out living room but wanted to keep the rustic theme going in our house. So we made rustic frames for our movie theater.


Materials:


  • Pine wood 1x4
  • Stain or Clear Coat
  • Tape Measure
  • Saw
  • Wood Glue
  • Nails and a nail gun
  • Hanging Hardware
  • Movie Poster
  • Tape


Directions:


  1. Measure the height and width of your poster. 
  2. Measure out the length of your boards to fit your poster. Make sure you have them long enough that your don't cover a lot of the poster but short enough that you will be able to cover a bit of the edge with the frame. 
  3. Double check your measurements and then cut your boards. 
  4. Glue and nail together each board to create the frame. 
  5. Let the glue dry and then stain or clear coat the wood. 
  6. Attach the hanging hardware to the back of the frame. 
  7. After the frame is complete simply tape the corners and a couple edges of the poster to the frame. 
  8. Hang up your poster and then enjoy your movie and popcorn!

Monday, August 13, 2018

Hand Print Frame

These were a fun and easy craft to make for Mother's Day. I made these for myself and for my sister. They would be great for a gift for many occasions. 


Materials:

Directions:
  1. Get the Frame
  2. Paint one hand, then make the hand print on the frame. 
  3. Make sure it drys before putting it together. 
  4. Place it on a shelve or use as a great gift for a mom, grandma, or family member. 

Sunday, May 20, 2018

DIY Pop Bottle Vase


This is a cute way to use those old glass pop bottles. I used the pick a pop bottles but you could use coke, 7 up, or any other classic glass pop bottle.


Materials:
  • 1x4 Pine Board
  • Miter Saw
  • Drill
  • Drill Bits
  • Spade Drill Bit
  • Air Nailer & Nails
  • Wood Glue
  • Tape Measure
  • Pencil
  • Sandpaper
  • Clear Coat Polyurethane 
  • Glass Pop Bottles
  • Flowers and Water
Directions:
  1. Make sure you have all of your materials ready. 
  2. Measure out how long you will need each board based on the number and height of your bottles. Mark your cutting lines.
  3. Cut your boards to the correct lengths. We cut ours to put them together at an angle. 
  4. Hold the boards together to make sure they fit together and are all the correct length. 
  5. For your top board where the bottle will come through, measure out and mark where you need to drill the holes. 
  6. Make a small hole with a regular drill bit first. Then use a spade bit to make the hole big enough for the bottle top to come through. 
  7. Sand your boards to get out any rough spots and edges. 
  8. Glue and nail the ends together. It will become more sturdy once the glue drys. 
  9. Carefully sand any other spots on the boards. 
  10. Check to see if the bottles will fit into their spots. You may need to sand down the bottom edges of the holes to give a little more space to get the bottles in. 
  11. Once the bottles fit and the glue is dry it is ready for the clear coat. Remove the bottles before painting the clear coat. You could also stain this to match your decor. The natural wood goes well with the decor in our home. 
  12. After everything is dry place the bottle back in their spots.
  13. Fill the bottles with water and add your flowers. 
  14. Use your new DIY decor as a centerpiece for everyone to see. Enjoy!

Sunday, April 29, 2018

Spring Bird Kids Craft

 Happy Spring!


This cute spring picture is perfect to bring a little spring into the house. 

Materials:
Directions:
  1. Draw and cut out a tree with branches, leaves, clouds, ovals for birds, and beaks. 
  2. Glue on all the parts starting witb the tree, then leaves, clouds, birds, and last beaks.
  3. Add googly eyes on the birds with the luquid glue.
  4. Squeeze glue out along the bottom of the birds and press in you dry grass.
  5. Add a little detail of tree bark with a brown marker.
  6. You can add Happy Spring! or even some little music notes above the birds. Tweet Tweet!


Saturday, April 28, 2018

Old Window Picture Frame


I found this old window and had to do something with it. 


  Materials:

Directions:
  1. Find an old window
  2. Clean it up. Do not scrub to hard, you don't want to take away any of the distressed look. 
  3. Add the hanging hardware on the back. 
  4. Add your photos using small pieces of clear tape. 
  5. Hang it up!


DIY Wood Pallet Coffee Cup Holder


My husband helped me make this wood pallet coffee cup holder. It was a fun project for us to do together. I found this pallet this size but you could break down a larger pallet to make it the size you want.
This pallet is 2ft x 2ft

Materials:
Directions:

  1. Find or make a small pallet. 
  2. Add a couple small boards to create a shelf. 
  3. Using stencils, paint the word coffee across the top.
  4. Add the hooks for the coffee cups. 
  5. Now it is ready to hang. It is heavy so we screwed it into a stud on the wall. 

Popular Posts

09 10