Popular Posts

Showing posts with label Gifts. Show all posts

Wednesday, December 8, 2021

Christmas Tree Ornament

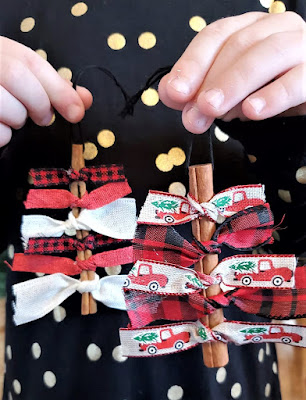
 Christmas Tree Ornament with Cinnamon Sticks 

These are cute and smell great! I made these to hang on out tree this year. I love that they were super easy to make so the kids were able to make some too. 

All you need is cinnamon sticks, some cute ribbon, string and hot glue!


Supply List

Cinnamon Sticks

Ribbon (with wire works best, but is not necessary)

String or hooks for hanging

Hot glues gun and Glue

Drill with a small drill bit (optional)


Follow these few steps to make these cute ornaments!

1. To hang your ornament you will need a string or a hook connected to the cinnamon stick. I used a drill with a very small drill bit to put a hole through one end of the cinnamon stick. I then put the string through the hole to have a hanger. If you don't want to make a hole you could also tie a sting around the cinnamon stick and secure it with some hot glue. 

2. Tie some ribbon pieces on your cinnamon stick making them shorter to longer from top to bottom. If you are using wired ribbon they will stick out from the sides better. If you are not using wired ribbon you will be able to glue them to the cinnamon stick a little so they will stick out. 

3. Using the hot glue help secure the ribbons to the cinnamon stick if necessary. 

4. Now you are done and have a cute ornament to hang on your tree or even use as a gift! 

Happy Holidays!


Tuesday, November 19, 2019

"Elsa's Ice" Rock Candy


Disney's Frozen II is coming out in theaters this week! Elsa's Ice Candy is perfect to make for a Disney's Frozen themed Party or just for fun. I made this for a fun treat for my kids and they loved in.


Ingredients:
  • 1-3/4 cups Granulated Sugar
  • 1/2 cup Light Corn Syrup
  • 1/2 cup Water
  • Food Coloring 
  • 1/2 tsp. Flavoring
  • Powdered Sugar for coating
*Other materials you will need include a sauce pan, baking sheet, and candy thermometer. 

Directions:
  1. Lightly spray a baking sheet or place a silicone baking mat on a baking sheet. 
  2. Add sugar, corn syrup, and water to a sauce pan. Bring to a boil while stirring constantly to dissolve sugar. Once it is boiling you can stop stirring. Let it keep boiling until it reaches 300℉ on your candy thermometer. 
  3. Once the temperature reaches 300℉ remove it from the heat. Working quickly, add the food coloring and flavor. I used strawberry flavor and a few drops of blue gel food coloring, so it ended up tasting like cotton candy. Stir quickly and pour onto your prepared baking sheet. Tip the sheet frpm side to side to help spread the candy and tap the sheet lightly to remove bubbles. 
  4. Allow the candy to cool and harden completely, about 30 minutes.
  5. Flip the baking sheet over to remove the candy. Use a hammer or something sturdy to break your candy into desired size pieces. 
  6. Coat your candy pieces in powdered sugar. This will stop it from being sticky. If you want cleaner or more clear looking pieces, use a lint free cloth to rub some of the powdered sugar off. 
  7. Keep in an air tight container. Enjoy!

Tips/variations:
*You can make your candy any color or flavor. This could be an easy treat to add to any themed party. I love to have red cinnamon candy during the holidays.  
*Be careful when breaking the candy, it will be a little sharp.


Monday, November 11, 2019

Snowman made with Birch Logs


This is so cute and rustic! 

Great way to add some winter decor to your home!


Materials:
  • Birch Logs, 1 large, 1 medium, 2 small, and 1 slice. 
  • 1 Wood dowel (1/4 inch)
  • Drill with a bit slightly bigger than your dowel
  • Wood Glue
  • Fabric for a scarf and bow ( I used Flannel)
  • Acrylic Paint
  • Craft Glue or Hot Glue
  • 2-3 Small Black Buttons
Directions:
  1. Get your logs cut and sand them if needed. If you find a small one with a branch piece sticking out you can use it for the nose. 
  2. Drill a hole half way through the center of your largest log. Drill a hole, in the center, all the way through the medium log, 1 small log, and the slice. Drill a hole half way through the last small log. 
  3. Now put the dowel through and stack your logs large, medium, small, slice, and small. Add wood glue in the drilled holes if you would like it to be sturdy. You may need to cut down your dowel to make it the right length. 
  4. Paint on a snowman face. I just did the the eyes because I had a branch piece for the nose and didn't want to add a mouth. If you do not have a branch sticking out just paint on a carrot nose. Make it the way you want!
  5. Use your fabric to make a scarf and a small bow for the hat.
  6. Glue on your bow for the hat and the buttons. 
  7. Now you are done and have a cute little snowman to decorate with or even give as a gift!

Sunday, November 10, 2019

Scarecrow and Snowman Double Sided Porch Decor

This Scarecrow and snowman reversible porch decor is so cute. Flip it to the scarecrow for the fall season and then to the snowman for the winter. What a fun project to make! 


Materials:

  • 1 1x10 Pine Board cut at an angle (height 40in)
  • 2 1x2 Pine Boards (length 13in)
  • Nails and Hammer or Air Nail Gun
  • Acrylic Paints
  • Clear Satin Spray Paint
  • Twine String
  • Buttons 
  • Greenery for Snowman Hat
  • Leaves and Flower for Scarecrow Hat
  • Hot Glue Gun & Glue

Directions:
  1. Cut Board and lightly sand if necessary. 
  2. Nail the small boards towards the top at an angle. If you cut the 1x10 at an angle, then measure from the top to your small board to make the angle is the same. 
  3. Paint one side white with a black hat for the snowman. Then paint the other side light brown with a dark brown hat for the scarecrow. Let the paint dry good before painting the other side. 
  4. Add the details! I painted a face and scarf on the snowman. I Added a shirt, overalls, and face to the scarecrow. 
  5. After you are done with all of the painting, you will want to do a clear coat over it all. I use clear satin spray paint to seal it for the outdoors. 
  6. Warm up your hot glue gun. I added the twine string with a bow, buttons on the overalls, and leaves and a flower to the hat on the scarecrow side. Add buttons to the belly and winter greenery to the hat on the snowman side. 
  7. Place inside or outside to decorate for the fall season and then flip it over for the winter season. This is also a great gift idea!


Friday, March 16, 2018

Red, White & Blue Party Favor/ Thank You

Thanks for Coming!
***
Now let's get Star Spangled Hammered!

This is a fun a easy party favor to use on many occasions. I used these for a red, white and blue themed Bachelorette party. Your guests will love their Red, White & Blue Thank You.


Materials:

  • Can of Sprite
  • Mini Vodka Bottles
  • Thank You Note
  • String

Directions:
  1. Create Tag. I typed up and printed off the thank you, used decorative scissors to cut out the note and a colored paper, then glued the two together. I whole punched the tag and tied a small string on to make a loop. 
  2. Tie a long sting around the mini bottle, add the note, then tie it all around the can of pop. 
  3. Set them out for your guests to enjoy!

Variations:
  • You could use this same concept but add a different theme tag or just a simple Thank You note. (Green tag with an Irish thank you, Red tag with a holiday thank you, etc...)
  • Change the type of alcohol or pop for a different kind of drink.
09 10