Showing posts with label Christmas. Show all posts

Wednesday, December 8, 2021

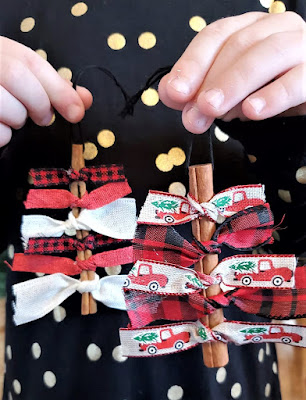
Christmas Tree Ornament

 Christmas Tree Ornament with Cinnamon Sticks 

These are cute and smell great! I made these to hang on out tree this year. I love that they were super easy to make so the kids were able to make some too. 

All you need is cinnamon sticks, some cute ribbon, string and hot glue!


Supply List

Cinnamon Sticks

Ribbon (with wire works best, but is not necessary)

String or hooks for hanging

Hot glues gun and Glue

Drill with a small drill bit (optional)


Follow these few steps to make these cute ornaments!

1. To hang your ornament you will need a string or a hook connected to the cinnamon stick. I used a drill with a very small drill bit to put a hole through one end of the cinnamon stick. I then put the string through the hole to have a hanger. If you don't want to make a hole you could also tie a sting around the cinnamon stick and secure it with some hot glue. 

2. Tie some ribbon pieces on your cinnamon stick making them shorter to longer from top to bottom. If you are using wired ribbon they will stick out from the sides better. If you are not using wired ribbon you will be able to glue them to the cinnamon stick a little so they will stick out. 

3. Using the hot glue help secure the ribbons to the cinnamon stick if necessary. 

4. Now you are done and have a cute ornament to hang on your tree or even use as a gift! 

Happy Holidays!


Monday, November 11, 2019

Snowman made with Birch Logs


This is so cute and rustic! 

Great way to add some winter decor to your home!


Materials:
  • Birch Logs, 1 large, 1 medium, 2 small, and 1 slice. 
  • 1 Wood dowel (1/4 inch)
  • Drill with a bit slightly bigger than your dowel
  • Wood Glue
  • Fabric for a scarf and bow ( I used Flannel)
  • Acrylic Paint
  • Craft Glue or Hot Glue
  • 2-3 Small Black Buttons
Directions:
  1. Get your logs cut and sand them if needed. If you find a small one with a branch piece sticking out you can use it for the nose. 
  2. Drill a hole half way through the center of your largest log. Drill a hole, in the center, all the way through the medium log, 1 small log, and the slice. Drill a hole half way through the last small log. 
  3. Now put the dowel through and stack your logs large, medium, small, slice, and small. Add wood glue in the drilled holes if you would like it to be sturdy. You may need to cut down your dowel to make it the right length. 
  4. Paint on a snowman face. I just did the the eyes because I had a branch piece for the nose and didn't want to add a mouth. If you do not have a branch sticking out just paint on a carrot nose. Make it the way you want!
  5. Use your fabric to make a scarf and a small bow for the hat.
  6. Glue on your bow for the hat and the buttons. 
  7. Now you are done and have a cute little snowman to decorate with or even give as a gift!

Sunday, November 10, 2019

DIY Wood Trees


These wood trees are so cute and easy to make. 

Perfect for some holiday decor!


Materials:
  • 1x2 furring strip boards
  • Saw
  • Small nails and hammer or a nail gun
  • Acrylic paint

Directions:
  1. Start with cutting your boards. These don't need to be any specific size, you can make them and small or large as you want. I start with the center tall board. My trees are about 18 inches tall.
  2. Next cut the branch pieces. The top one at 3 inches, and then add 1 inch to the next one each time going down (3in, 4in, 5in...). For the base I cut 4 boards, 5 inches long. 
  3. Now you can nail your tree together. Start by nailing the base piece on, like shown in the image below. Next add the branch pieces on the center tall board, hang the base over the end of your table space so the boards lay flat. Be careful!
  4. Now that you have your tree put together you can add some paint to the front side if you would like. Another option would be to stain the entire tree a dark brown or even leave it natural. 
  5. Now you can place your trees in your home or outside for some cute decor. I like to put mine on my upper cabinets in my kitchen. To add a little holiday cheer you could add some small lights or mini ornaments to your tree. If you decide you want to put your outside, it would be best to seal the wood and paint. 

Scarecrow and Snowman Double Sided Porch Decor

This Scarecrow and snowman reversible porch decor is so cute. Flip it to the scarecrow for the fall season and then to the snowman for the winter. What a fun project to make! 


Materials:

  • 1 1x10 Pine Board cut at an angle (height 40in)
  • 2 1x2 Pine Boards (length 13in)
  • Nails and Hammer or Air Nail Gun
  • Acrylic Paints
  • Clear Satin Spray Paint
  • Twine String
  • Buttons 
  • Greenery for Snowman Hat
  • Leaves and Flower for Scarecrow Hat
  • Hot Glue Gun & Glue

Directions:
  1. Cut Board and lightly sand if necessary. 
  2. Nail the small boards towards the top at an angle. If you cut the 1x10 at an angle, then measure from the top to your small board to make the angle is the same. 
  3. Paint one side white with a black hat for the snowman. Then paint the other side light brown with a dark brown hat for the scarecrow. Let the paint dry good before painting the other side. 
  4. Add the details! I painted a face and scarf on the snowman. I Added a shirt, overalls, and face to the scarecrow. 
  5. After you are done with all of the painting, you will want to do a clear coat over it all. I use clear satin spray paint to seal it for the outdoors. 
  6. Warm up your hot glue gun. I added the twine string with a bow, buttons on the overalls, and leaves and a flower to the hat on the scarecrow side. Add buttons to the belly and winter greenery to the hat on the snowman side. 
  7. Place inside or outside to decorate for the fall season and then flip it over for the winter season. This is also a great gift idea!


Thursday, February 21, 2019

Special K Bars


A Delicious Classic Bar for any occasion!


Ingredients:
  • 1 cup Sugar
  • 1 cup Corn Syrup
  • 1 cup Peanut Butter
  • 6 cups Kellogs Special K Cereal
  • 1 cup Milk Chocolate Chips
  • 1 cup Butterscotch Chips

Directions:
  1. In a pot on the stove at medium heat, stir the sugar and corn syrup constantly until boiling. 
  2. Remove from heat and stir in Peanut butter. 
  3. Put cereal in a large bowl. Pour the sugar over the cereal and mix well. 
  4. Pour into a lined cake pan and press flat.
  5. Melt together both chips on low heat in a small pan. Stir constantly so it does not burn. Pour over the bars and smooth out with a knife. 
  6. Put in the fridge to cool. Once cooled, cut into bars. 
  7. Enjoy!

Tips/Variations:
  • Add festive sprinkles to the top of the chocolate before cooling for special occasions. 
  • If you melt the chips in the microwave be sure to stir every 20 to 30 seconds. It will burn quickly. 


Mint Chip Cookies


These Taste Just Like Mint Chip Ice Cream!


Ingredients:
  • 1 cup Butter, Softened
  • 1 1/2 cups Sugar
  • 2 Eggs
  • 1 1/2 tsp. Mint Extract (not peppermint)
  • 1/2 tsp Vanilla Extract
  • Green Food Coloring
  • 3 Cups Flour
  • 2 tsp. Baking Powder
  • 1 tsp. Baking Soda
  • 2 tsp. Cream of Tarter
  • 1/4 tsp. Salt
  • 1 Cup Andes Cream de Menthe Baking Chips
  • 1 Cup Semi-Sweet Chocolate Chips


Directions:
  1. Preheat oven to 350℉
  2. Cream Butter and sugar until fluffy. 
  3. Add eggs, 5-10 drops of food coloring, and mint extract. Mix well for about 2 mins. Add more food coloring if needed, the color will lighten when dry ingredients are added. 
  4. In a separate bowl mix dry ingredients. Sift into wet ingredients a little at a time. Mix until combined. 
  5. Add the mint and chocolate chips and stir until incorporated. 
  6. Line cookie sheets with parchment paper or silicon mats. Drop cookies using a cookie scoop or about 1 1/2 table spoon size balls. 
  7. Bake for 8-10 mins. Watch for them to start cracking and then remove from oven. Let cool on baking sheet for a few minutes to set. Transfer to a cooling rack to finish cooling. 
  8. Enjoy within 4-5 days! Yum!

Tips/Variations:
  • You can put these in the freezer once baked and cooled to save for a special occasion. These are best if frozen in an air tight container for up to a month. 
  • These are great any time of the year but great for Christmas or St. Patrick's Day because they are green. 
  • Make these into an ice cream sandwich with one scoop of vanilla ice cream between for a cool treat. Or break into pieces over a bowl of ice cream.

Banana Bread


 This always turns out moist and delicious! It never lasts long in our house!


Ingredients:
  • 1/2 cup Butter, Softened
  • 1 cup Sugar
  • 3 Ripe Bananas, mashed
  • 2 eggs, beaten
  • 1/2 tsp Salt
  • 1 tsp Baking Soda
  • 1 1/4 cups Flour

Directions:
  1. Preheat oven to 350℉
  2. Cream together butter and sugar. 
  3. Add beaten eggs and mashed bananas, mix well. 
  4. Mix dry ingredients in a separate bowl. Add slowly to the wet ingredients until combined. 
  5. Pour into a greased and lightly floured loaf pan.
  6. Bake for 45-55 minutes.
  7. Let cool and Enjoy! I like to cut a slice out while it is still warm and spread some butter on it. 

Tips/ Variations:
  • Make banana bread muffins instead! Grease and flour a muffin tin and bake for about 20 minutes. Do not use muffin liners, it will stick. 
  • Keep in an air tight container on the counter for 4-5 days.


Monday, December 3, 2018

Blue Mason Jar Potpourri Decor


Blue Mason Jar Decor

Materials: 
  • Blue Mason Jar
  • Potpourri
  • Twine String
  • Printed vintage Photo

Directions:
  1. Fill the jar with potpourri.
  2. Tie the twine around the top of the jar with the vintage photo attsched.
  3. Use as decor in your home or give as a gift. Great as a teacher or coworker gift. 

Popular Posts

09 10